Sunday 20 December 2015

A morning on the tiles

Lightcliffe 'box is just about finished ... just the nameplate to go now.


Sunday 8 November 2015

Adding some colour to proceedings

A busy day with paints (Vallejo Model Colour acrylics) and powders (PanPastel) and Lightcliffe signal box now has a bit of colour in its cheeks.


Next job is to add the glazing to the windows.

Also discovered today that Andrew Stadden has now started producing some of his Victorian/Edwardian figures in 2mm scale - http://www.acstadden.co.uk/Pages/2mmftFigures.aspx

Have ordered a couple of packs and will report back on them when they arrive - look very nice on the photos and if they're anything like Andrew's larger scale figures, they'll be just the job for my Coniston layout ... the signal box for which is also in the paintshop at the moment but isn't very photogenic.

Sunday 1 November 2015

Lightcliffe Signal Box - painting decision made and undercoat applied

Right ... balcony brackets refined, side boards added to the balcony to disguise wonky boards and undercoat applied.

Toilet roof will have to be re-tiled as the slate slips didn't take too kindly to a bath in my ultrasonic cleaner and a couple of solder balls have had to be replaced but otherwise the box is now redy for the painters.

LMS painters are in very short supply and have a lot of work to do though so the box will be appearing in L&Y livery - not quite sure how tired a finish to go for yet, will see once the base colours are on.


Sunday 25 October 2015

Just how efficient were the LMS at repainting signal boxes?

Evening all,

Been a bit grotty this weekend, so didn't manage to get to the group meeting yesterday, but the weekend wasn't a total write off modelling wise as I managed to make some more progress with Lightcliffe signal box.

The walls are just about finished, and the front and end walls have now been affixed to the sub-base (which will eventually be hidden by the platform). The window cleaner's balcony and protective railings have been added to the front and toilet end wall as well (the balcony appears to have been extended around the corner onto the door end wall when the staircase was moved sometime after 1938 but whilst the staircase ran down the side of the end wall it stopped at the end of the front wall.

The internal floor has also been completed with the lever frame painted up and basic furniture added but needs toning down a bit and then the internal walls need painting and some detail adding.

There are a few minor things that need tidying up but otherwise I'm almost ready to apply some primer ready for painting. Thing is though, I'm still not sure what colours to paint it in. The layout's set in the 1930s but I quite fancy applying a bit of modeller's licence and painting the box in L&Y colours and pretending that the LMS painters have been busy elsewhere and haven't quite got to Lightcliffe yet!

Will have to take some soundings on that methinks ...

Anyway, here's a few more progress shots including some cruel close ups to show the window cleaner's balcony (very fiddly to do and the cause of some rather choice language this afternoon).


Monday 12 October 2015

Further progress on Lightcliffe 'box

OK ... really just a series of build photos showing my rather laborious construction techniques.

Front wall panels with lower windows ready for fitting after holes have been opened out.

And with windows fitted.

Rear wall, massively over height for the moment. The box was built on an embankment and was lower at the back than it was at the front, but I haven't been able to find any photographs of the rear of the box yet and the drawings I've been working off are for a standard L&Y box.

Beginnings of the door end wall.

Window frames being assembled.

Basic door end wall complete (staircase to be added).

Trial fit of end and front walls.

Toilet end wall.

Finials - two for the main roof and one for the toilet roof - made out of 0.75mm square rod with a Ratio top and a 0.76mm solder ball on the bottom).

Toilet roof tiled using slate slips cut into 2mm squares and with finial affixed.

Lever frame under construction.

Staircase fitted to door end wall (mix of Plastruct and scratchbuild and very fiddly).

And another trial fit of the front wall and the door end wall.

Next job is to get the interior done and then it's on with the roof.

See you next time.


Monday 31 August 2015

A tale of two signal boxes ... and the loss of another friend

Sad news to start again, I'm afraid, in that since my last post word has reached me of the death of David Sellars. Again, I didn't know him as well as other members of the group but David was the first person I met when I went along to one of the Group's sessions at Keighley and instantly made me feel welcome.

Unfortunately, we didn't see much of him over the last couple of years and I last bumped into him about a year ago at Halifax show where we had a good old chinwag.

What I didn't know about was his life outside modelling. The limit of my knowledge was that he was a book binder by trade but he was a very fine craftsman indeed, creating bindings for the Booker Prize winners and the William Hill Sports Book of the Year.

For more about David and his work, please see http://davidsellarsbookbinder.com/About-David-Sellars.php

RIP David.

Modelling time has again been limited due to work commitments, but there has been some progress on Coniston signal box (which now has a roof) and I've made a start on the box for Lightcliffe having put together the window frames for the front wall.

Hopefully get a bit more done today and tomorrow before it's back to work on Wednesday.

Coniston Signal Box - front
Coniston Signal Box - rear
Coniston Signal Box - northern end
Coniston Signal Box - southern end
Lightcliffe Signal Box (courtesy L&Y Society)
Window frames for the frontage - Evergreen strip assembled on glass with Lemonene

Sunday 2 August 2015

'F' is also for Fencehouses and footbridges ... and 'C' is for Coal tank.

Not much progress to report on Lightcliffe since my last post - at least not by me ... I've had a couple of Saturday afternoons on the layout laying cobbles but didn't have my camera with me, so no photos. Must remember to take it with my to the next Group meeting on Saturday. 

The layout was on a show as a work in progress at the Keighley MRC's 'Small Scale' show a couple of weeks ago but I wasn't able to attend and haven't had any feedback on how the day went, but hopefully it was a success.

So what have I been up?

Main modelling activity has been progressing my model of Coniston signal box. I built the base for this about three or four years ago and had a go at the upper section but wasn't totally happy with it and set the model aside for a rethink as to how best to do the outside framing.

 Previously completed base.

I eventually settled on a method that seemed to work - Evergreen strip cut to size and then laid on plate glass, squared off using Zona flat squares, and stuck together using Limonene. Leave each assembly to dry and ease off the glass with a scalpel. Each assembly was then affixed to Evergreen boarded plastic sheet which was then cut to size. I did also try using Butanone rather than Limonene but it stuck too well to the glass and there was some furring of the strip as a result. Easy enough to tidy up, but the Limonene was far gentler.

Glazing was then added using microscope cover slips painstakingly cut to size and there things rested for a couple of weeks.

Semi-complete upper panels - glazing bars and glazing still to be added.
 
The next step was to build the chimney and fireplace into the rear panel (the one with the single window) and then assemble the floor and the side and rear panels and paint the interior. Now this was where I'd gone wrong last time, totally messing up the glazing. A bit of head scratching this time and the decision to try a different method of painting. My paint of choice is usually acrylic but I've been playing around with pastels recently and have discovered the PanPastel range - pans of dry pastel that you can either sponge or brush on. Gave those a try and very impressed with the effect.

So walls and floor painted, internal paneling added and painted and then a few internal bits and pieces added - upright desk, comfy chair (no sign of the Spanish Inquisition) and a representation of a Tyer's Number 6 tablet instrument. Something missing though - the lever frame. Bit more head scratching before inspiration struck - Brassmasters signal levers and some more Evergreen strip. Couldn't quite manage all 36 levers of the prototype but squeezed 32 in.
 
With the lever frame in place, the front panel was added and the whole thing given a clean with rubbing alcohol. Unfortunately a couple of the microscope slips have cracked in the process but they aren't too noticeable and overall I'm pleased with how it's gone. Much better than my previous attempt.
 
 
But none of this has got anything to do with Fencehouses or footbridges I hear you cry!
 
Patience dear reader. For that's the second half of the update. For Bob Jones of Fencehouses has now come up trumps with the etches for the footbridge for Lightcliffe ... and very nice they look too. As ever with Bob he's also sent me some very detailed instructions and I just hope I can do justice to his work. Hopefully can't go far wrong if I heed his words - 'take your time and have fun'!
 
 
Also included on the etch are some 2mm Furness Railway 'Squirrel Seats" which I commissioned from Bob - looking forward to building those.

Etches for Furness Railway 'Squirrel Seats"
 
One other thing to mention before I forget and that's the 2mm Coal Tanks etches I'm looking to get London Road Models to produce. Messages have been posted on RM Web and Western Thunder about this and there's a note in the latest 2mm Association Newsletter but if anybody hasn't seem them and might be interested then please let me know. Expressions of interest only at this stage - a price has yet to be established but moves are also afoot to produce a chassis and a boiler casting and wheels, buffers and fittings are already available from the Association/N Brass Locos.

Right, that's your lot for this time. See you next time.

Friday 22 May 2015

This post was brought to you by the letter 'F'

That's 'F' for friends, fencing, flagstones, foundations, fenestration and the Furness Railway!

First up, some sad news, in that word reached me a couple of weeks ago of the death of Alan Pollock.

When I first went to one of the Pennine Group meetings approximately 18 months ago, Alan was one of the first people I met and he instantly made me welcome. By the end of that meeting he'd already passed on the responsibility for constructing the buildings for Lightcliffe on to me, albeit that he was a constant source of inspiration from that point on.

A shared enthusiasm for the railways of Cumbria was soon identified (LNWR in his case, Furness in mine) - and numerous e-mails passed between us concerning building construction techniques and the layouts that we were both planning. The last exchange we had was about fencing for Lightcliffe following on from a site visit that Alan had made to get some measurements and there will be a certain poignancy when it comes to adding that to the layout.

My condolences go to his family - I'm sure he'll be missed by all who knew him.

In a way, it was the news of Alan's death that prompted me to pick up the modelling tools again after something of a work enforced hiatus and I hope that I can go on to repay the trust he put in me at that first meeting.

In terms of Lightcliffe, I've more or less got the first of the platforms to a point where I'm happy with it, so it's on now with the other portions. Construction is a foamboard and plasticard sandwich with stone coated slips cut to size and stuck on with PVA, whilst the edging is Redutex 4mm scale stone block. The stone slips were grouted and the whole structure was then coloured and weathered using artists pastels, weathering powders and modelling dust.

A bit of greenery has been added too (bring us a shrubbery!), and the next step will be to finish off the detailing of the platform - adding some more grass, as well as fencing (white picket?) and railings and a coal hole - and then bedding in the buildings ... but first I've got to finish off the main staircase for the footbridge so that once we've got the etches for the metalwork from Bob Jones they can be soldered up and affixed to the staircase and the whole assembly can take it's place on the platform.


It can be a bit tricky working on structures away from the layout as I found to my cost at the last but one meeting when the platform clearances were a bit tight! Hopefully all will be well at the next meeting.

Another job that needs doing but can only really be done in situ is cobbling the roads. As a result of discussions at the last but one meeting I attended, I bought a 3D roller with the idea of impressing the cobbles into Das or something similar, but I'm struggling to apply this consistently and am going back to the idea of using plasticard or Redutex. Further discussions on that next time out methinks.

Bumpy cobbles!

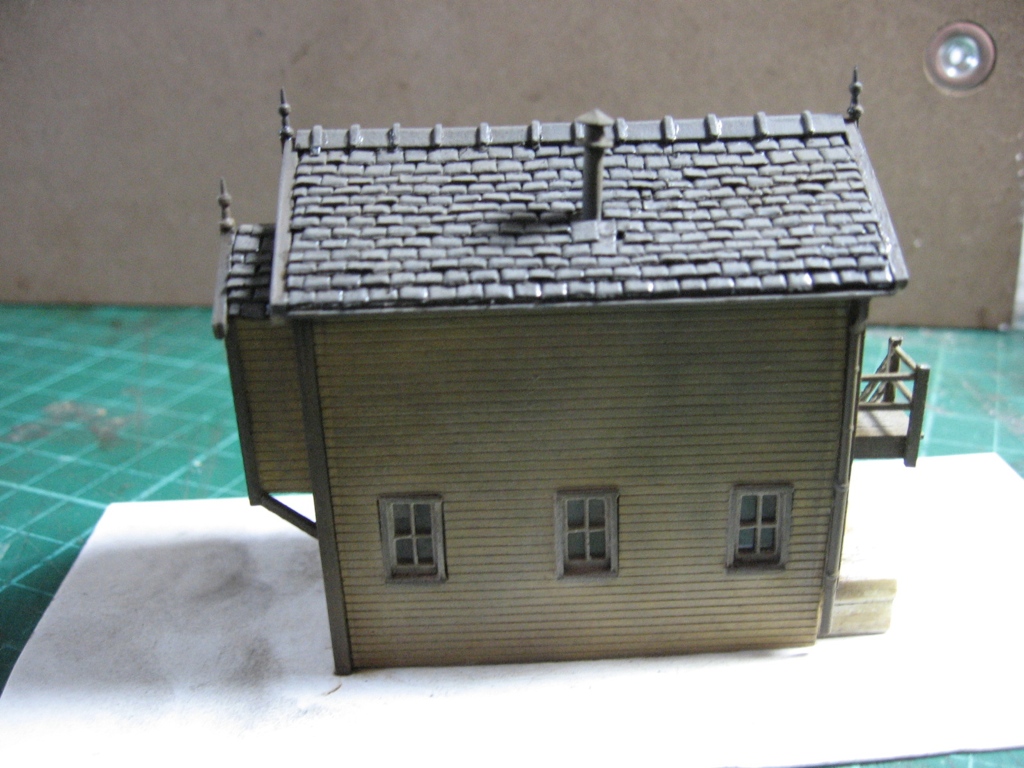
In addition to the buildings for Lightcliffe, I've also dug out the buildings that I was starting to put together for my own embryonic Furness Railway layout. This has the working title of 'Yewdale' and will be based on Coniston circa 1915. I'll shortly be embarking on a 3D mockup of the layout but for now it's the signal box that's occupying my time. It's a fascinating structure which, in real life, was an amalgamation of a wooden, outside framed, upper section (which had originally been in use at Carnforth) with a stone base.

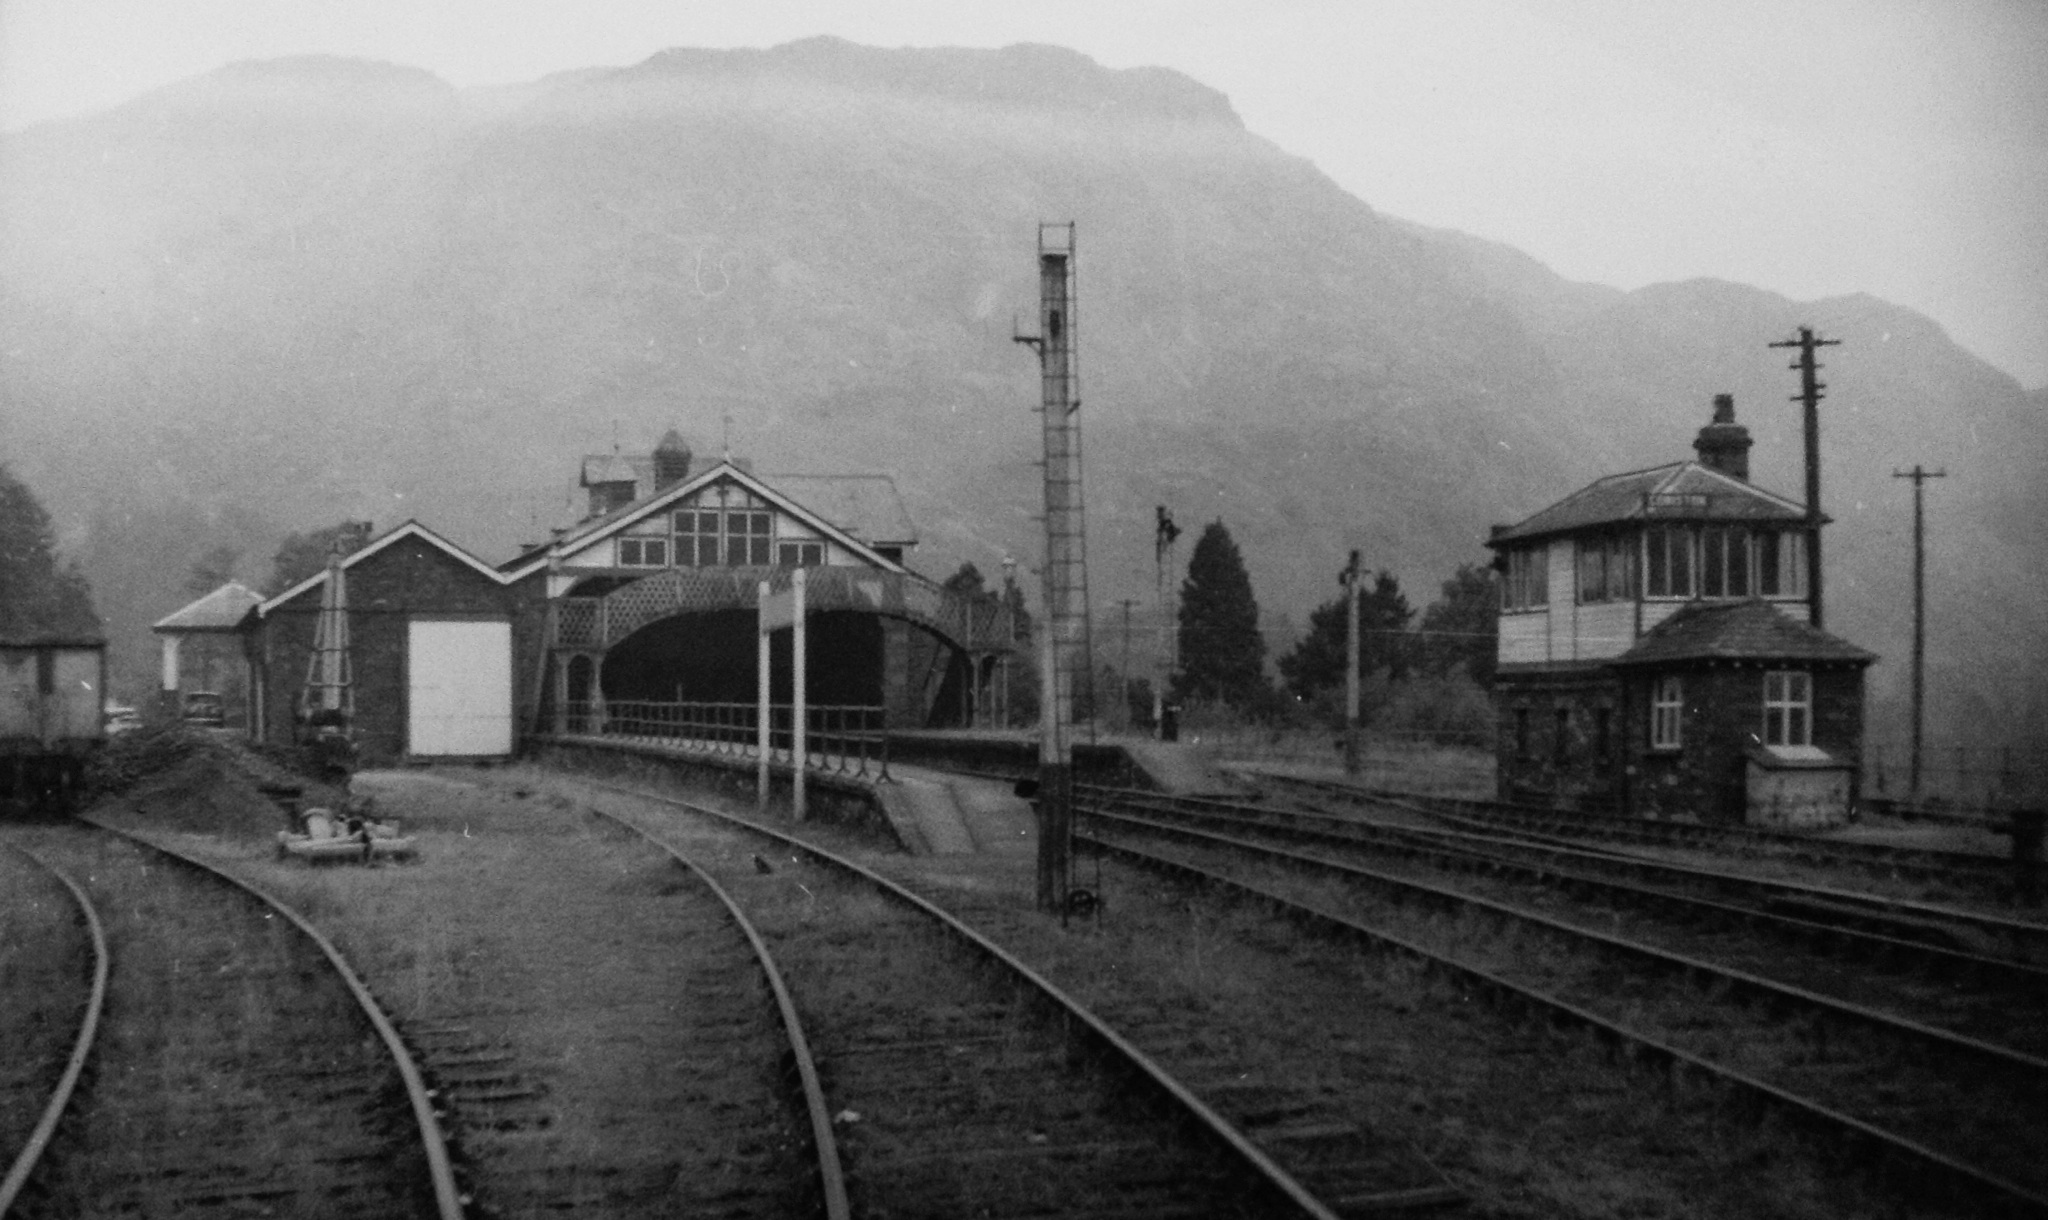
  Coniston in 1961 (most of the outside cross bracing had been removed by this time)

Cross bracing still in place on end panels

The base I built three years ago, but I was never happy with the upper panels or with the roof so decided to have another go and have now managed to produce some panels that I'm happy with and have just started to glaze them.


Fiddly but fun!